TLDR
This is a step by step guide to install Mastodon (or Hometown) from source, using a Linode VPS, Linode S3 Object Storage with nginx cache proxy, Mailgun for e-mail and porkbun for domain registration. It is complete, it is meant for beginners, and it should be suitable for complete beginners.
If you are just here for the recipe, and want to skip over the cooking-blog backstory, jump to first step: Getting your domain name from porkbun.
Introduction
The target reader of this guide is someone who has little previous experience setting up their own websites/domain names/web services but wants to set up a Mastodon or Hometown instance capable of hosting up to a few hundred users.
I went through the process of setting up a Mastodon (and later, Hometown) instance in 2021. I found that there were very few resources or guides that were clear and comprehensive for a beginner. I figured it out myself, (hopefully) learned and taught myself a few things, and now I would like to skillshare that with people who are in a similar place to where I was when I started!
Since the recent influx of new users and interest in the Fediverse, there have been many more "how-to Mastodon" guides published, but I still have yet to find a good practical one for beginners. Most guides that are suitable for beginners are mostly just demonstrative. They don't really help set up an instance for real-world use by hundreds of users. Rarer still are guides to installing Mastodon from source which account for and permit easy migration to Hometown afterwards.
The intention of this guide is not to set you on a path to running an open-registration 10000+ user instance. For one, there is an order of magnitude increase in the technical knowledge and skill to set up and maintain an instance like that. Massive instances are also more likely to face moderation quagmires. Some argue that instances that large shouldn't even exist in an ideal Fediverse since they are less sustainable without corporate intervention or defeat the point of decentralization.
I hope this guide will encourage and support instances that are not just small, but based around pre-existing communities or groups who already share affinity: local neighborhoods, online communities, geographic regions, local subcultural political-adjacent scenes (queers, punks), broader political scenes (anarchists and their friends), or collective projects. Basically, groups of people who already know each other and have some affinity for each other as friends, neighbors, or comrades.
Small instances of a few hundred people who already share affinity and/or real-life relationships are especially well suited for the Hometown fork of Mastodon, since it allows local-only posting, encouraging a bit of a community-building. But this isn't about creating small isolated bubbles or "echo-chambers". For a user, their instance is the home-base and the infrastructure where their account lives, but it also connects them to the rest of the Fediverse where they see different perspectives, build solidarity across differences and make new connections and relationships. Small instances like this are sustainable, stable, and easy to moderate because of the tighter connections between their users. Small, stable and sustainable are good characteristics for your home-base!
But the Fediverse also needs to be big and broad and diverse. If I'm advocating for more small instances then there needs to be an instance for everyone (except for Nazis and fascists who can die slowly and alone :> ). So, I also hope this guide will make it easier for more people, especially people without as much access to technical knowledge and skills, to set up their own small instances. This guide provides a step-by-step to get you started with an instance that should feel pretty comfortable and affordable in that under-500-users space without you needing to become a full-time certified sysadmin to keep it running. If fifty people follow this guide, we could have fifty cozy 200 user instances instead of a single giant 10000 user moderation nightmare!
Hometown
You've probably heard of Mastodon, but what is Hometown? Hometown is a light-weight fork of Mastodon maintained by Darius Kazemi. Hometown adds a few desirable features to Mastodon:
- Local only posting
- Custom max post length
- Exclusive lists
- Better rendering of Articles and rich text
- Much more!
Running Hometown also requires installing Mastodon from source, rather than using Docker or relying on various "one-click" installations of Mastodon, so this guide will walk through that process and include how to migrate your fresh Mastodon installation to Hometown immediately. You can also follow this guide and just stop when you have successfully installed Mastodon if that's what you want. The process to that point is almost the same, and you can always migrate to Hometown or another fork later if you follow this guide (with some caveats).
Who are you?
This guide is meant for people who have little past experience with system administration or setting up their own web services. I tried to assume as little prior knowledge as possible. Many guides will gloss over things like setting up DNS, or assume the reader knows when to use sudo (and when to not use sudo) or what directory certain commands should be run in - things that are not obvious to a novice and will trip them up completely. I've tried to include every small step and tip to help rookies get through without the prior knowledge that other guides assume.
That being said, you will need some basic pre-requisites to get through this guide. You will need some basic computer literacy and familiarity. You should understand the basics of how domain names and websites work. You should also be at least a little bit comfortable with using the command line in Linux - ideally you know how to get around, and you've used nano before to edit a file or two on the command line. If you have 0 command line experience, I would suggest the Tech Learning Collective's free Foundations courses. But if this is your first big "command line project" after switching to Linux a few weeks ago, then I would encourage you to plow ahead!
This guide also assumes you are using a Linux-based computer to connect to your server and manage your ssh keys - if you are using Windows or MacOS you will have to consult some other resources I link to for that part (although it is not difficult!). If you are interested in running a Mastodon/Hometown instance there's a good chance you'll end up wanting to run Linux on your personal computer soon anyways, so why not just get it over with!? (joke)
What will you get in the end?
If you follow this guide, you will end up with with:
- a domain name for your instance registered with porkbun
- a Virtual Private Server (VPS) running the Debian 11 operating system, hosted by Linode, with basic configuration and security hardening
- a Mastodon or Hometown instance installed from source on the server
- Object Storage for media files, also hosted by Linode, allowing your instance to scale pretty easily & cheaply
nginxset up as your webserver and as a nifty cache proxy for the Object Storage- Mailgun set up and configured to send e-mail for your instance
What won't you get?
I'll leave you with some tips for ongoing maintenance, but this guide will not turn you into a pro sysadmin. And you hopefully won't need to master every aspect of system administration and the command line to keep your server running in the future. BUT! this should be considered the beginning of your journey. You must be committed to continuing to learn how your server works and acquire skills and knowledge that will help in administering and securing your server in the future. Eventually you will need to do a major update on your server, tweak things to help overcome growing pains, or troubleshoot a problem.
This guide will also not cover how to actually administer and moderate a small instance. Setting up an instance is just one step, but you also must consider everything else that goes into building a community: coming up with guidelines, moderation policies, how the server costs will be paid, how you will not burn out, your instance's identity as an entity in the Fediverse... For that, I suggest you start by checking out Darius's excellent guide runyourown.social, or some of the other resources linked at the end and do some thinking and planning (ideally with some friends!) before you dive in.
As administrator, you are also responsible for the security of your instance and its users. You need to start learning about how to keep your server secure, and how to administer your instance so your users are free from harassment or worse threats online.
This can feel like a lot of responsibility. But don't be discouraged too easily! I've seen many takes saying that people or groups without experience or technical skill should be discouraged from setting up their own instances. "The tech is too hard to manage. Moderating an instance is too tricky. It's too dangerous. Instances with inexperienced administrators are doomed to fail, which will disenfranchise users and result in a bad reputation for Mastodon or the Fediverse as a whole."
I disagree. I'm an anarchist: autonomy, empowerment, and self-determination are important to me. I think people are capable of taking on the responsibilities involved in achieving those things for themselves, even if it can be a bit bumpy at times. I will reiterate that I think the Fediverse needs more smaller instances, especially those based around communities with affinity or pre-existing social relationships. For this to happen, running your own instance needs to be made more accessible to people and groups starting out with less technical experience or skill (and I don't think expensive managed hosting qualifies here, because decentralization is important too). You need to consider the commitment ahead of you (consider bringing in some friends to help shoulder that!) but don't be totally discouraged by the responsibilities or commitments that come with running an instance. If I figured it out, so can you!
What to expect?
Following this entire guide will probably take at least 2-3 hours and maybe longer if you get stuck or are new to this. Set aside a long evening or Sunday afternoon to try it.
You will be signing up for and configuring various services in your web browser. This guide uses the following 3 services:
This guide can be adapted to use different service providers, and if you feel comfortable doing that you should try, you may be able to find a better deal and perhaps you can share your experiences! But if you are truly new to this, stick to the same service providers I'm using so you don't run into any problems.
You will be using ssh to connect from the command line on your personal computer to the command line on your server.
You will be copy pasting a lot of commands into the command line.
You will be using the command line text editor nano to edit configuration files (mostly by copying and pasting).
Do the math for me
How much will this all cost? In USD, this set up costs:
- Linode = $15/month
- Mailgun = hidden Flex plan, which is 80 cents per 1000 emails
- domain = annual fee, based on what domain you choose but probably between $5 and $15
So basically there's an annual fee for the domain name and then it's ~$15 per month. This works great for up to a hundred users, and should be able to easily handle more (depending on how active they are). This setup should also be able to scale up a bit without costs skyrocketing, by easily upgrading the Linode server in place. I expect this to be able to handle up to 500 somewhat active users, maybe with a bit of tuning of how Mastodon works and upgrading the Linode server one or two tiers (which is generally seamless to do). Scaling beyond that is outside the scope of this guide, but I've added some links at the end if you ever need them!
Pep talk for success
Follow the recipe
I have made this guide thorough to the point of pedantry, but for good reason. I would like someone with little experience to be able to follow it to success without getting stuck. If you already have some experience with this stuff, you may want to set things up differently in line with your own preferences. Feel free to use this guide as just that, a guide, instead of a step-by-step walkthrough! But do so at your own risk. I've tried my best to make sure that following these instructions exactly will work, and I intend to keep them updated, but they are specific to the services and choices here, and are not necessarily easily generalized. Using a different domain name registrar is probably no big deal, but trying to use a different S3-compatible Object Storage provider might get really tricky.
If you notice an error, or have a suggestion for how this guide could be improved, please contact me!
COPY PASTE COPY PASTE
Following this guide will involve a lot of copy-pasting. You will be copying and pasting commands from here into the command line (sometimes altering them slightly), copying and pasting configurations into text files, and copying and pasting passwords and usernames.
I strongly suggest that you actually copy paste (rather than manually typing) whenever possible. Copy and paste every command, password, username, email address, domain name, config change, etc and always verify that what you pasted is correct and actually want you wanted to paste. Make sure you copy the complete command and make sure you don't accidentally paste over the wrong thing in a config file. Make sure you replace any placeholders in a pasted command (like replacing YOUR.DOMAIN with your actual domain.
Almost every problem you will run into will be due to a typo. You will save yourself a lot of headaches later if you are careful and meticulous in your copy-pasting!
Command common sense
As per the last point, you will be running lots of commands that you have just pasted into your terminal. This doesn't mean you should just blindly copy-paste-return your way through this guide! Each time you paste a command try to understand what it is doing and why, at least in a vague way. I've done my best to explain all the commands and their different components (although there are times when I don't even really know what they are doing).
After running a command, look at the output and try to interpret it before proceeding. Does it seem like it did what it was supposed to? Is there an error? Did you make a typo in the command? If you plow through a command that failed without noticing, you will run into problems later and not know why (and it will be very hard to figure out). You may not totally understand every command nor be able to interpret the (sometimes lengthy) output. But try to examine the results of each step and use your common sense to figure out if the command probably worked or not. This will also help you build your knowledge and confidence in the command line in general.
Server vs Instance
In this guide when I refer to the server I am talking about the actual cloud server. This is your Virtual Private Server or VPS provided by Linode (note also that Linode refers to servers hosted by Linode as... "Linodes"). Your server runs the Debian operating system, and you use ssh to connect to your server on the command line and run commands to install, configure, and update software.
When I refer to your instance I am talking about your instance of Mastodon or Hometown that is running on the aforementioned server. You log in through your browser to interact with your instance.
Things you will need
Money
You will need a credit card. Linode and porkbun take credit cards or Paypal, but Mailgun requires a credit card (even if it won't be charged).
Password manager
Throughout this guide, you will be creating many account credentials (username + password) as well as other "secrets" that you will need to save securely and keep organized. If you are not already using a password manager, now is a good time to set one up. If you try to keep track of all of this in a notepad or spreadsheet, there's a higher chance you'll make a mistake or loose a password and be locked out. It is also absolutely non-negotiable that you use secure and unique passwords, and any password manager these days will generate and save great unique passwords for you.
Consider using BitWarden if you want to sync your passwords, or KeePass if you want to keep them offline (but remember to back them up).
Dedicated e-mail account
You'll need an e-mail account to handle everything related to the infrastructure of your instance - consider setting a dedicated one up in advance. I suggest you use that dedicated e-mail address to sign up for Linode, porkbun and Mailgun, and as the administrator contact e-mail for your instance. Save the credentials for this e-mail in your password manager!
It's a good idea to use an e-mail for this that isn't too sketchy sounding. If you use an e-mail account like randomstringofcharacters @ protonmail.com, Linode and Mailgun may flag your new accounts right off the bat, and you'll have to do some work to prove that you are actually a valid person and not a scammer. So it's good advice to use a nice polite sounding e-mail for your accounts.
A phone number
Linode and Mailgun require a verified phone number for an account. You'll need a phone number that can receive SMS messages. You can use your own phone number, or you can try setting up a VoIP number for this purpose.
Getting your domain name from porkbun
Create your porkbun account
Go to porkbun and create an account - save the credentials in your password manager!
Choosing and registering
This is a fun way to start, but possibly the hardest decision you will have to make... What will your new instance be called!?
Start searching for a domain. Porkbun has all (most?) of the fun TLDs (top-level-domains, the part after the . like .com, .social, .town etc). Get creative. Note that some TLDs will be cheaper than others, and porkbun might also show you results for really expensive after-market domains (domain names that someone else already owns and is trying to resell). Also note that you pay for a domain name annually. You can buy for multiple years up front, and in any case at some point the domain will expire if you don't renew it!
Once you have selected a domain, create an account with porkbun, enter your payment info, and buy the domain! Porkbun also include "WHOIS Privacy", meaning that anyone can't easily just find your personal info by looking up who owns the domain name.
To make this guide, I registered the domain name tuppy.town, so you will see that domain name throughout the screenshots. I'm hoping to host an instance there in the future for people who love tupperware. Get in touch if you want an invite.
For the rest of this guide, you'll see YOUR.DOMAIN anytime you need to paste in the actual domain name you registered. Anytime you see YOUR.DOMAIN, you need to replace it with... your domain. My domain is tuppy.town, so I'm replacing YOUR.DOMAIN with tuppy.town every time.
Configuring Nameservers
After purchasing your domain name you should be on porkbun's domain management page. While we are here, we'll get a head start and point our domain name to Linode's nameservers.
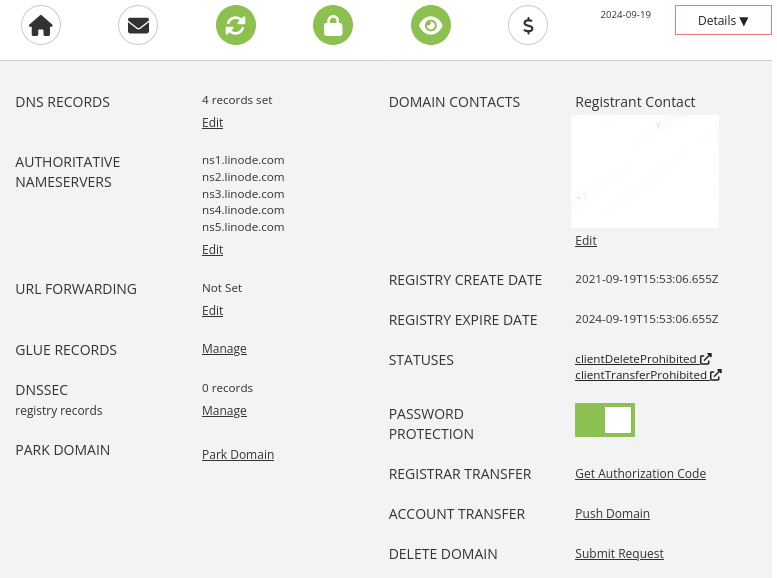
Click "Details" to open up the Details for your domain name, and click to edit the "AUTHORITATIVE NAMESERVERS". Here you should enter Linode's nameservers, one on each line as follows:
ns1.linode.com
ns2.linode.com
ns3.linode.com
ns4.linode.com
ns5.linode.com
It should look like this:
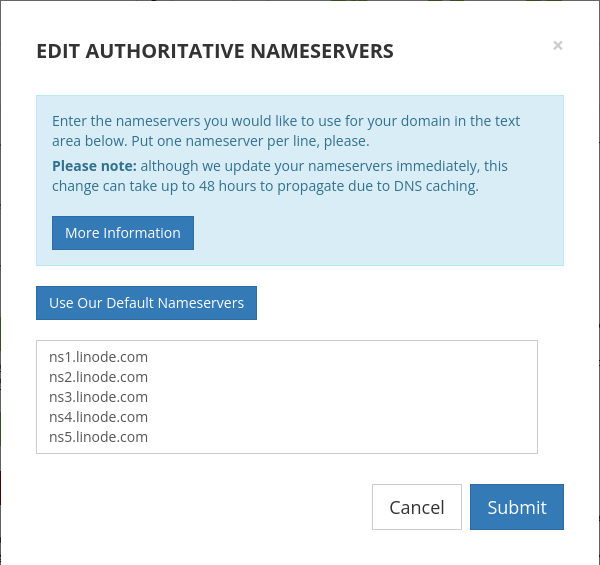
Click "Submit" and you are good to go. That's it for domain name registration!
Server provisioning from Linode
We will be signing up for 2 paid services at Linode: a VPS, which is the actual cloud server that runs Mastodon and hosts the database for your instance, and an Object Storage Bucket, which is a more efficient and cost-effective way to host a lot of media files (all the pictures and other media attachments your instance will host). Linode will also handle our DNS (making sure the domain name you just registered and subdomains you'll set up later, all point to the correct places).
Here is the straight dirt on this before you sign up for recurring paid services:
- $5 per month for a 250GB Object Storage Bucket with 1TB Monthly Network Transfer
- $10 per month for a Shared VPS Linode 2 GB / 50 GB with 2TB Monthly Network Transfer (bandwidth)
Linode pools all the Network transfer together everything on your account - with the above arrangement, you get a 3TB Monthly Network Transfer Pool which is.. a lot.
Also note that Linode actually charges by the hour. This means that if you just want to experiment, or if you get stuck and give up you won't be on the hook for the entire monthly bill - just however many hours your Linode server and Object Storage bucket actually existed. If you just delete both from your account, you won't be charged anymore.
Create your Linode account
Go to Linode, or if you feel like it go to my REFERRAL LINK and sign up for an account - save the credentials in your password manager!
I have never in my life done this before, but that is a referral link. If you use that link you will get $100 free credit (which is nothing special.. Linode is seemingly always giving away free credit to new accounts). If you use Linode for some # of months, apparently I will get $25 credit, which will simply be used to fund my own instance. If one person does this, it will cover the cost that went into doing a few dry runs of this guide!
Create your Linode!
Log into your Linode account and find yourself at your dashboard.
Click on the blue Create button and select Linode.
Fill out the following information:
- Under
Choose a Distribution, selectDebian 12 - Under
Region, select whichever is closest to you - For
Linode Plan, click to theShared CPUtab and selectLinode 2 GB - For
Linode Labelyou can enter whatever you like, or leave it as default. This is just for you to identify your own server within Linode. - For
Root Passworduse your password manager to generate a long and unique password, and then save the password in your password manager.
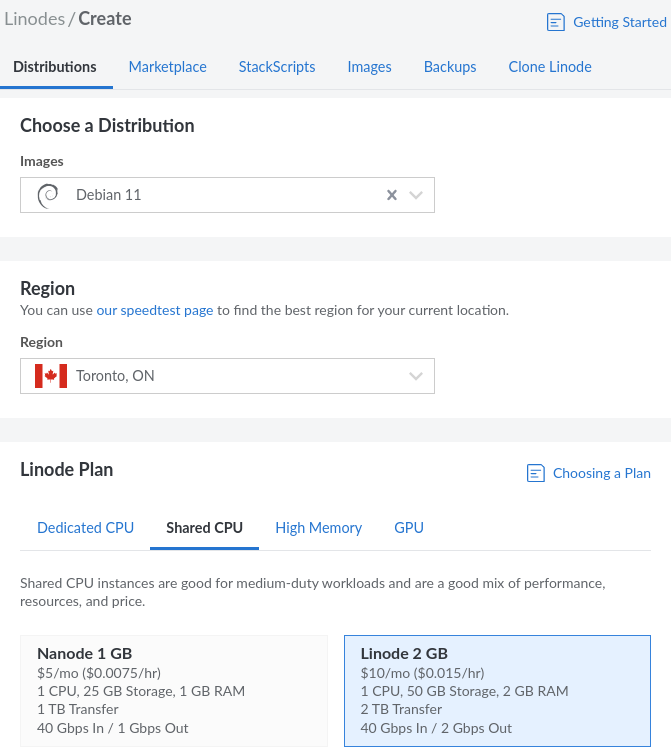
That's it. Everything else you can leave, and click the blue Create Linode button at the bottom.
Your new server will now be spinning up, which can take a minute or two.
Request mail ports be opened
Linode has a special firewall that blocks the ports used for sending e-mail. Your server will need to send e-mail with Mailgun (which we'll start setting up in the next step). The only way to get this lifted is to open a support ticket with Linode.
Go to https://cloud.linode.com/support/tickets from the browser where you are logged into Linode and click Open New Ticket.
For title, put "open port 587" or something similar. For "What is this regarding?" select "Linodes" For "Linode" select the server you just set up.
In "Description", explain that you are setting up a Mastodon server and it will need to send e-mail for user registration, notifications, and password resets.
Hello, I am setting up a Mastodon server on this Linode and it needs to send e-mails for user registration, notifications, and password resets. Please open port 587.
Then click Open Ticket.
You will have to wait a little bit for customer support to address your Ticket, but Linode customer support is pretty fast. It shouldn't take more than an hour, and hopefully it'll be done by the time you need that port open. You can continue on with the guide while you wait, and I'll let you know when we need to check if this has been done.
E-mail with Mailgun
A service like Mailgun is needed so your instance can send e-mails. This is crucial, because e-mails are sent to users when they first register (to verify their e-mail account) and whenever a user requests a password reset. Users might also use e-mail for notifications, and they are used for moderation reports.
Mailgun has a free tier that lets you send up to 1000 e-mails per month, which should cover a small instance (especially if users have their e-mail notifications turned off).
Create your account
Go to Mailgun and register for an account - save the credentials in your password manager! You will have to put in your credit card info to open an account, and then you will have to respond to an activation e-mail Mailgun sends you, which then asks you to verify your account by providing a phone number and sending an SMS to it.
Downgrade to Mailgun's secret Flex plan
Mailgun was recently bought by another company and they changed their pricing a little bit. There used to be a free tier for up to 1000 emails per month. Now they give a 30-day free trial, but then you will be put on one of the (rather expensive) paid plans. You have to downgrade yourself to the secret unadvertised Flex plan, which charges only 80 cents for every 1000 emails. Most small instances do not need to send that many e-mails, unless any very active users or moderators make use of the e-mail notifications. If you do end up needing more e-mails, switching to another option down the road is not terribly complicated. Mailgun is a fine way to start out.
To get onto the secret Flex plan, you need to ask to cancel your Mailgun account. On the Mailgun dashboard click your account name in the top right and select the "Account" menu. Scroll down to the big red warning at the bottom and click the Begin Cancellation button.
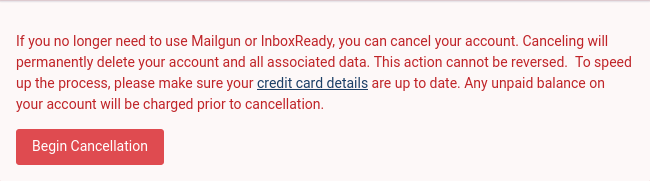
Mailgun will ask to switch you to the very reasonable Flex plan to keep your business. Do that!
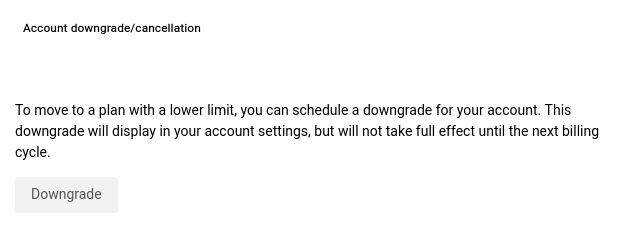
You should now be on your free trial plan for the first month, and after that your account is "scheduled to downgrade" to the Flex plan.
Add and verify a domain
I find the Mailgun website to be very confusing. Once you are logged in, you want to click on the "Sending" menu option on the left. This should bring you to the "Domains" menu, where there is a big green "Add New Domain" button. Click that.
We'll follow Mailgun's suggestions, so enter mg.YOUR.DOMAIN and click Add Domain
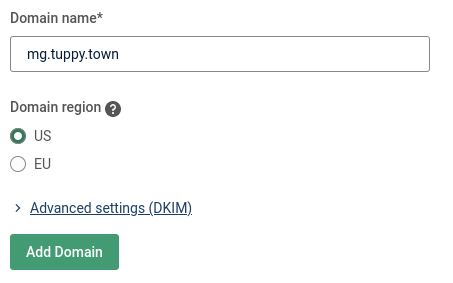
The next page you see on Mailgun should be the "Overview" for mg.YOUR.DOMAIN
Configure Linode DNS with Mailgun's settings
Now we have a tricky few steps. Remember when you registered your new instance's domain name, you entered Linode's nameservers in the porkbun dashboard? ns1.linode.com, etc? That was telling porkbun to tell the whole entire internet that Linode is in charge of your new domain name. Now you need to set up Linode's handling of our the e-maily parts of your domain name (called DNS for Domain Name Server) so that it is linked correctly with Mailgun. The short answer to why we have to do all this rigamarole is because spam e-mail became such a huge problem, and all this is meant to your instances e-mails more legitimate and less likely to be treated as spam.
If you scroll down a bit on the "Overview" page, you'll see that Mailgun is providing a bunch of settings that you have to carefully copy and paste into your Linode settings. Keep this page open, and open a new browser tab and go to your Linode dashboard. For the rest of this part, you need to have 2 browser tabs open. One for Linode and one for Mailgun. You'll be switching back and forth between them to copy settings from the Mailgun tab and pasting them into the Linode tab.
If you accidentally close this tab, or otherwise need to find these settings for your Mailgun domain again in the future, you can go to the "Sending" then "Domain Settings" options in the left menu on Mailgun's dashboard. Then click on the "DNS records" option at the top.
Create domain in Linode
First, we have to set up a new Domain in Linode, so that Linode knows it is in charge of our domain. We need to do this anyways, unrelated to the e-mail stuff. Linode will automatically set some defaults that point YOUR.DOMAIN to your actual server.
In the Linode dashboard, click the blue Create button in top left and select Domain.
For Domain, enter YOUR.DOMAIN
For SOA Email Address enter your e-mail address
For Insert Default Records, click the dropdown and select Insert default records from one of my Linodes
A new option will appear to select the Linode. Select your Linode from the dropdown menu.
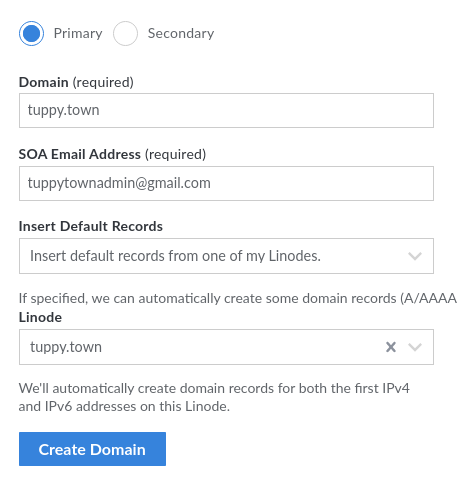
Then click Create Domain
Now you'll be on the Domain Settings page for your domain. It's broken up into different sections based on the different types of DNS "records". We are going to be editing the MX Record, A/AAAA Record and TXT Record sections.
But before we start, take a quick break, stretch, and re-fill your water bottle (you've been drinking water, right?). This is the first really complicated part of the guide!
Delete some unneeded defaults
OK, first thing we'll do is delete some of the default records we don't want. You can delete a record by clicking the little 3 dots on the right of a record and selecting Delete from the little menu that appears.
Delete the mail.YOUR.DOMAIN record from the MX Record section.
Delete both mail records from the A/AAAA Record section.
Add TXT records
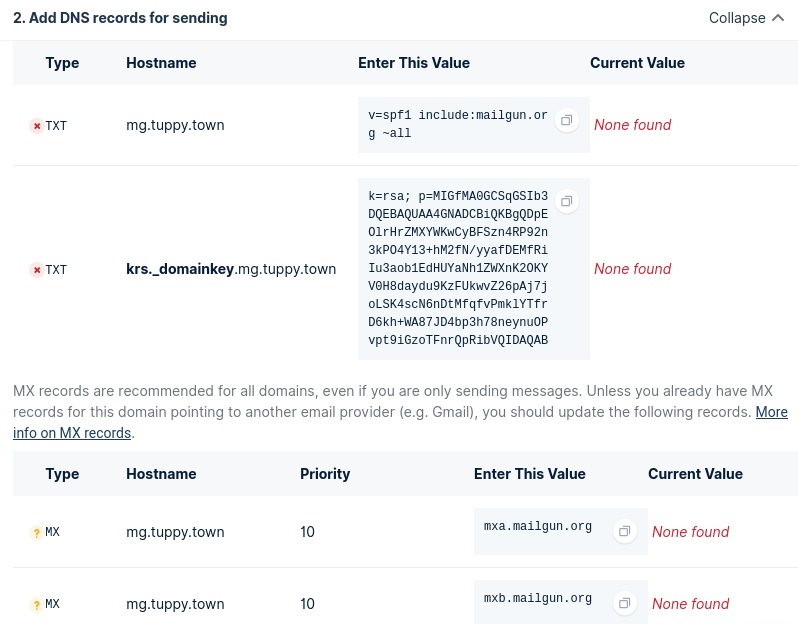
Now let's start to add the settings from Mailgun. Go back to your Mailgun tab, and scroll to 2. Add DNS records for sending
Look at the first TXT DNS Record. Copy the hostname.
Go back to the Linode Domain Settings, and scroll down to TXT Record and find the blue Add a TXT Record button and click it. Paste the hostname you just copied into the Hostname field.
Go back to your Mailgun tab, and now copy what is entered in the Enter This Value column for the first row. You can us the handy little 'copy' icon (the white circle with 2 squares), or just carefully select the text.
Back to the Linode Domain settings. Paste into the Value field. Now look over what you've entered and check it against what's in that first row on the Mailgun tab. You want it to be the same. Make sure you didn't accidentally copy an extra space or line. When you are confident, click Save.

Repeat the above process for the next row, which is also a TXT record. Add a new TXT Record in the Linode Domain Settings, and paste the Hostname and Value from the corresponding places in the Mailgun tab.
You should now have 2 TXT records for your domain in your Linode Domain Settings. Again, do a dummy-check and verify that what you have on your Linode Domain Settings is the same as what is in the Mailgun tab.
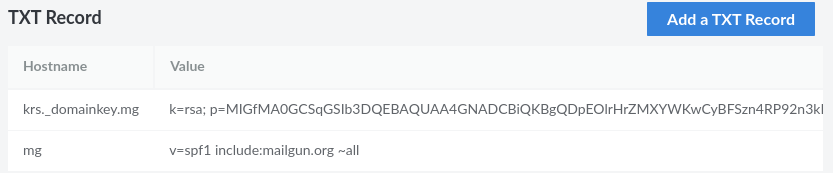
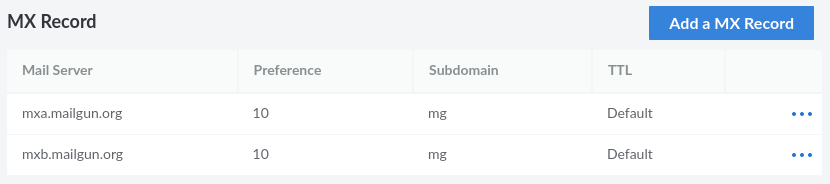
Add MX Records
On the Mailgun tab below the TXT records we just dealt with, there are two MX records.
On the Linode Domain Settings, Scroll to the MX Record section, and click Add a MX Record
For Mail Server, enter the Enter This Value value from the Mailgun page - it is probably mxa.mailgun.org
For Subdomain, enter the first part of the Hostname from the Mailgun tab before the . - if you are following the defaults, then it will be mg
Repeat this for the second MX record, where the only difference is the Hostname is mxb.mailgun.org
Verify your domain
Go back to the Mailgun tab.
We can ignore the CNAME record that Mailgun wants us to add since that is only needed for tracking/marketing e-mails.
Click the big green Verify DNS settings button. We want to see the yellow or red icons next to the TXT and MX turn green. Mailgun is verifying that all the settings we just entered into our Domain Settings (at Linode) is correct and has propagated around the Internet. If it doesn't work, just be patient and try again. In theory you could have to wait as long as a few hours, but it rarely takes more than a few minutes. If after waiting it is still not working, make sure that you didn't make any mistakes copying and pasting, and didn't add an extra space somewhere. If you are positive you did everything correctly, just take a break and return to it later. If you've been moving through this guide quickly, it can take a little bit of time. Be patient, this is another good time for a break!
You'll know it worked when all the icons turn green. The Mailgun website sometimes just dumps you onto another page when this happens. So if the page changes, it may have worked. Mailgun will also e-mail you when the verification has worked.
Whatever screen you end up on in Mailgun once verification has worked, click on the Dashboard link in the left menu. You can scroll down and see your domain. If it has a green check next to it, it worked! If it still has a yellow question mark, try refreshing the page. Once you get the green checkmark, click on Domain settings for your domain to the right of your domain name.

Create SMTP credentials
There's one last thing to do at Mailgun, and that's create the actual SMTP account credentials (username + password) that Mastodon or Hometown will use to send e-mail. On the Domain settings page for your domain, click on SMTP credentials at the top menu. It's a tab at the top.
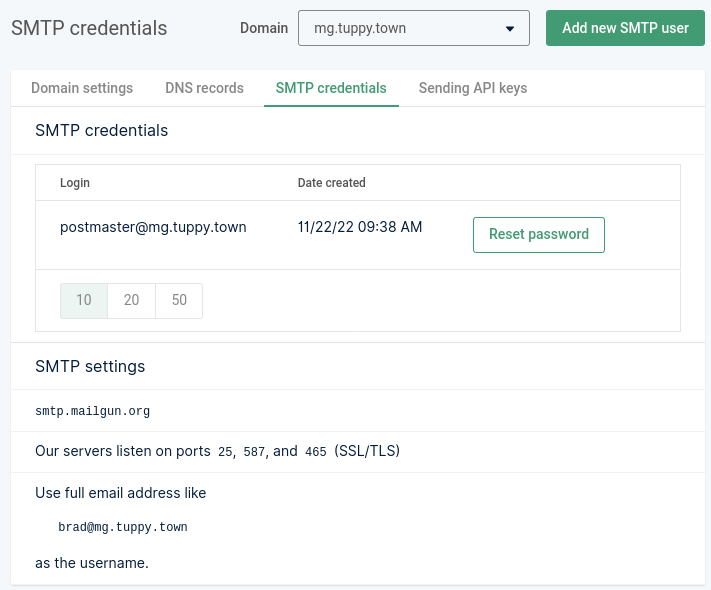
The default username is fine: postmaster@mg.YOUR.DOMAIN
To get a password click Reset password. This will generate a new password. A pop-up will appear with a Copy button so you can copy the password to your clipboard. Immediately go and paste it into your password manager, along with the username (the default being: postmaster@mg.YOUR.DOMAIN).
And that's it! We're done with Mailgun for now. We'll use the SMTP username and password later when we are setting up Mastodon.
One last domain thing at Linode
Before leaving the Linode Domain Settings for our domain, there is one last Record we need to add. Scroll to the A/AAAA Record section. You can see there are Hostname and IP Address columns. These records are what point someone who types your domain name into a browser to the IP address of the actual server where your instance lives (will live on!).
By default, Linode created 4 entries for your domain. Two for (YOUR.DOMAIN) and two for www subdomain (as in www.YOUR.DOMAIN). There are two each because your server has two IP addresses. One is IPv4, and one is the IPv6.
IPv4 is the old addressing system where every server on the internet has an address like XXX.XXX.XXX.XXX - IPv6 is the new system, where every server has a longer more complicated address.
Your new server has both an IPv4 and an IPv6 address, hence the doubled A/AAAA Records here for YOUR.DOMAIN and www (which are all pointing to the same server).
We are going to add one more subdomain, files (as in files.YOUR.DOMAIN), so we we need to add two A/AAAA Records - one with the IPv4 address and one with the IPv6 address. This subdomain will actually be used for accessing the media files on our S3 Bucket, but we point it at our server's IP address because later we are setting up an nginx cache proxy for it later. Don't worry if this doesn't make sense right now.
Copy the IPv4 address and click Add an A/AAAA Record. Enter files for the hostname, and then paste the IPv4 address into the IP Address filed. Repeat this using the IPv6 address. When you are done, your A/AAAA Records should look something like this:
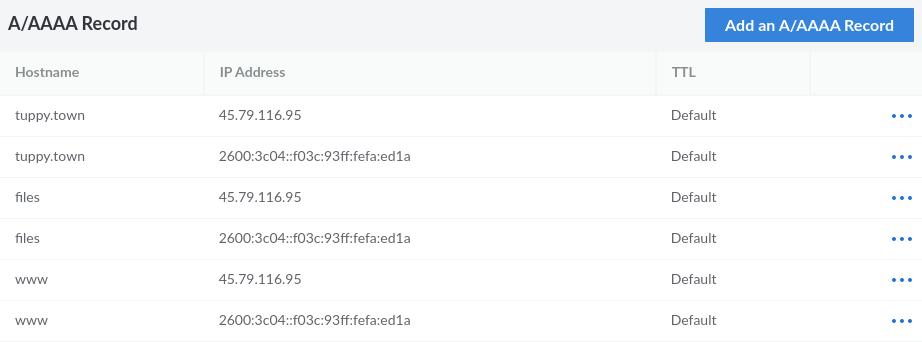
All our Domain Settings should now be configured!
Create Object Storage Bucket
We're going to create an Object Storage bucket on Linode which will hold all the media files our instance will store. Media attachments for posts, user avatars, etc.
In the Linode dashboard click the blue Create button and select Bucket.
You need to choose a name for your Bucket. This name can't contain a . or any other special character. Notably if you include any . by trying to breakup the Bucket name into subdomains, you will get annoying HTTPS SSL certificate errors later! It also has to be something unique not already used by another user on Linode. My suggestion is to use something like YOURDOMAINfiles, eg tuppytownfiles for the next step.
Name your Bucket: BUCKETNAME
Select a region close to you.
Note down the full url for your new Bucket. It should be something like BUCKETNAME.us-east-1.linodeobjects.com.
Click on Access Keys and then the blue Create Access Key button.
You can enter anything for the label.
Linode will now show you two long keys it has generated: the Access Key and the Secret Key.
Copy both of these and save them in your password manager. If you lose/forget them, you have to re-generate new ones. We will need these later when setting up Mastodon.
Server set up
Time to get into the command line. We have to do some basic set-up and securing of our new server. This section is roughly based on Linode's guide for setting up and securing a new server.
You're gonna need the root password which you should've saved in your password manager earlier!
Fire up a terminal and let's connect to our server! If you are on Linux, whatever your built-in or preferred terminal emulator will do. If you are on Windows you can use PuTTY, and here is a guide for that. If you are using MacOS, you can follow this guide instead.
You will need the root password you set in Linode when you first set up the server. You have it handy in your password manager, right?
ssh root@YOUR.DOMAIN
If that doesn't work, it could be because you are moving through this guide really quick, or parts of the internet DNS system are moving slow. The whole internet might not yet know that YOUR.DOMAIN is supposed to point at your server. You can try using the IP address of your server instead of YOUR.DOMAIN - you can find it in the Linode dashboard.
If the connection works, enter yes to accept the identity of your new server.
Paste in your root password.
Depending on your terminal emulator, you might not be able to use the copy and paste commands you are used to - check what the keyboard shortcuts are for your specific terminal, or often you can copy and paste by right clicking with your mouse!
You should now be logged into your server on the command line! You're a real hacker now! Feel free to say "I'm in" in a gravelly voice.
Update, always update
First thing we are going to do is bring our server up to date. Type the following two commands:
apt update to fetch all the new updates that may be available for your server
apt upgrade to apply all those updates
You may have to click Enter or type y while applying all the updates.
When all the updates are done, it's probably a good idea to reboot your server. You can type reboot and you will be booted from your server while it reboots! Wait a minute or two and then log back in:
ssh root@YOUR.DOMAIN
Followed by pasting your root password.
Set hostname
Set a hostname for your server. This can just be YOUR.DOMAIN
hostnamectl set-hostname YOUR.DOMAIN
Set timezone
Set the timezone to a 'home timezone' that makes sense for your server. The command
timedatectl list-timezones
will give you a list of all possible timezones. You can type q to exit the list. Find the one you want to use, and copy it to paste into the next command to set the timezone:
timedatectl set-timezone 'TIME/ZONE'
New limited user
So far, you've been doing everything on your server as the root user. This is not considered best-practice. The best thing to do is create a new user who is not root but has access to the sudo command to run commands with administrative privileges. This is an extra step to make sure you don't accidentally run potentially destructive commands as root and it's also considered a good security practice.
After we finish this section, you won't use the root user again to work on your server. In the future, you'll be connecting as this new limited user and in fact we will disable the root account from even being able to log-in!
You can call this limited user user or you can use whatever username you like. I'm calling it user, so you'll see it referred to as such in the rest of the guide. You can use your own preferred username if you like. Whatever you do, save the username and password together in your password manager!
The command to create a new user named user is:
adduser user
You will be prompted to enter a new password. User your password manager and create and save a good password!
For all the other user info it asks for, just hit Enter to confirm everything else.
The last thing to do with this new user (named user) is add it to the sudo group so that we can perform privileged operations as user in the future by typing sudo before any commands we want to run that require administrator privileges. You will be periodically prompted for user's password when you do this.
Add user to the sudo group:
usermod -aG sudo user
Now type
exit
to log out of your server!
Create and set up ssh keypair
We're going to generate an ssh keypair and use that to log into our server instead of a password. This is a special file that lives on your computer that you will need to log into your server on the command line in the future.
If you are not familiar with managing ssh keypairs, it can be a bit daunting. But this is considered a really important security step for securing a server.
This guide assumes you are using Linux as your home computer. If you are not, consult Linode's guide for doing this on Mac or Windows.
Generate the key
Let's get to it. Remember you are back on your own computer, in the terminal typing in these next commands - not logged into to your new server in the Linode cloud!
Type the following command to generate an ssh key:
ssh-keygen -b 4096
Hit enter to go with the default key name and location: eg home/user/.ssh/id_rsa
You can also optionally set a passphrase for the key. If you do set a passphrase you'll need this passphrase whenever you want to use the key. This is considered a good extra security step. Use your password manager to generate and save the passphrase
Copy the key to your server
Now you need to copy the public part of the key to your server, so that you'll be able to log in.
We're going to copy it to the server and associate it with the user account we created earlier.
Run:
ssh-copy-id user@YOUR.DOMAIN
And you will be prompted for user's password. After that is complete, your server how has a copy of the public half of your ssh key. When you log in, the private half on your computer is what proves it is you and permits you to log into the server
Logging back in as user using the ssh key
Log back into your server as the user account you created earlier:
ssh user@YOUR.DOMAIN
You shouldn't be prompted for a password - the login worked automatically, thanks to your ssh key being on your computer. Remember: you'll always need that ssh key to log into your server, for example from a different computer. Make sure it's backed up!
(If you do ever lock yourself out of the server, you can get back in via the Linode dashboard)
Harden ssh access
Now that we are logged back in to our server, we are going to do a few extra tweaks to harden ssh access.
Remember we have logged in as user not root. So we have to use sudo sometimes to run commands that require root privileges.
We are going to edit the sshd_config file.
Open it with nano by typing:
sudo nano /etc/ssh/sshd_config
Scroll to the line that says
PermitRootLogin yes
and change it to
PermitRootLogin no
Then scroll to the line that says
PasswordAuthentication yes
and change it to
PasswordAuthentication no
To save the changes and exit nano, type control-o, then enter, followed by control-x
Now we just need to restart the ssh daemon:
sudo systemctl restart sshd
That's it! Now the only way to log-in to your server is using your limited user account with an ssh key.
Getting ready to install Mastodon
This section and the next section will loosely follow Mastodon's own guide. That guide has a few well known issues/mistakes, and also glosses over some things that are not obvious to beginners. But if you are getting stuck on something it might be worth checking the official documentation.
Install pre-requisites
You should still be logged into your server as the user user while running these next commands. First, we have to set up Debian that we want to use a newer version of node than what is available in the Debian stable repo:
curl -sL https://deb.nodesource.com/setup_20.x | sudo bash -
This command is using curl to grab a setup script from the url entered. Then it directly runs the script with sudo.
Now run
sudo apt update
Before running the following command to install a whole slew of pre-requisite packages:
sudo apt install -y imagemagick ffmpeg libpq-dev libxml2-dev libxslt1-dev file git-core g++ libprotobuf-dev protobuf-compiler pkg-config nodejs gcc autoconf bison build-essential libssl-dev libyaml-dev libreadline6-dev zlib1g-dev libncurses5-dev libffi-dev libgdbm-dev nginx redis-server redis-tools postgresql postgresql-contrib certbot python3-certbot-nginx libidn11-dev libicu-dev libjemalloc-dev
apt is the package manager for Debian (and many other Linux distros). install is obvious. In this command, you are telling apt to install a long list of packages.
Now run this then command to install yarn
sudo npm install --global yarn
npm is another, different package manager (that we just installed in the last step!). We are using it because we want a really up-to-date version of yarn. And what is yarn? Well.. it's also a package/project manager. It's a little bit more specific and used for managing all the code in a project like Mastodon. yarn will put together and install all the actual pieces that make up Mastodon.
Set up database
The database is a really important part of Mastodon. All the user accounts and posts are organized in a huge database. Mastodon uses the database PostgreSQL. We have to run a few commands now to manually create and configure the database Mastodon will be using.
Use the following command to switch to the postgres user, which is the Linux user account "in charge" of the database. This account was set up automatically when we installed PostgreSQL.
sudo su - postgres
su is a command which allows you to switch to another user. If you are familiar with having a personal computer has multiple user accounts, it's a bit like logging out and then logging back in as another user. In this case we can run su followed by the username we want to switch to, and then we'll be entering commands as that user until we type exit to return to where we started.
Now that we are entering commands as the postgres user, enter this command to open PostgreSQL, the database software, where you will type a few special commands to set up the database
psql
Now type the following commands to create the database, and the database account:
CREATE USER mastodon CREATEDB;
Then run:
exit
to quit the database and get back to the postgres user and then run:
exit
again to get back to your user account's shell.
Create mastodon user
Another user! Yes we will create another user account just for running Mastodon itself. This user will be called mastodon. Run the following command to create the user:
sudo adduser --disabled-login mastodon
We don't need to enter any other info for this user account, but once again, you will have to hit Enter, or type y several times through the prompts to create the mastodon user.
Install Ruby
Ruby is the programming language that Mastodon is written in. We need to install Ruby!
Switch to the new mastodon user
sudo su - mastodon
And run each of these commands to install and set up Ruby:
git clone https://github.com/rbenv/rbenv.git ~/.rbenv
echo 'export PATH="$HOME/.rbenv/bin:$PATH"' >> ~/.bashrc
echo 'eval "$(rbenv init -)"' >> ~/.bashrc
exec bash
git clone https://github.com/rbenv/ruby-build.git ~/.rbenv/plugins/ruby-build
RUBY_CONFIGURE_OPTS=--with-jemalloc rbenv install 3.2.3
This last step is actually installing Ruby after getting a bunch of the pieces for it. It can take a long time, possibly 15 minutes, and won't really give you much feedback until it's done. Be patient!
Now run this command to set the version of Ruby we are going to be using to 3.2.3:
rbenv global 3.2.3
Now run:
gem install bundler --no-document
gem is yet another package manager for Ruby packages. bundler is a Ruby package we will use later!
Install Mastodon
Wow, we made it. We're going to install Mastodon.
Make sure you are still the mastodon user. Type whoami which will output the name of the user you are currently acting as.
If you are not mastodon then type
sudo su - mastodon
To switch to the mastodon user. If prompted for a password, enter the password for the user account.
Also, make sure you are in the mastodon user's home directory, which should be /home/mastodon/. You can type pwd (print working directory) to see what directory you are currently in. If you are not in /home/mastodon/, run
cd /home/mastodon
or
cd ~/
to switch to it. cd ~/ is a shortcut where ~ means "whatever the home directory for the current user is."
Now let's clone the mastodon repository from Mastodon's github repository:
git clone https://github.com/mastodon/mastodon.git live
This clones all the Mastodon code from the github repository into a new local directory called live
Now switch into that new directory:
cd live
Feel free to run ls to list the directory contents. Look at all the stuff!
Choosing a version of Mastodon
DECISION TIME: Are you planning to install migrate to Hometown?
At this point, you have to select which version of Mastodon you want to install. Normally, you would probably just install the newest most up-to-date version of Mastodon.
However, Hometown typically lags behind Mastodon by a few versions. If you are planning to install Hometown today, you must select the appropriate version of Mastodon which may not be the newest version of Mastodon.
When I first wrote this guide, the most current version of Mastodon was v4.2.7 and the most current version of Hometown was 1.1.1 or more accurately v4.0.14+hometown-1.1.1
The 4.0.14 there refers to the Mastodon version that the version of Hometown was based on. If you wanted to run Hometown v4.0.14+hometown-1.1.1, you needed to start with Mastodon v4.0.14, not Mastodon v4.2.7
Presently, the most current version of Hometown is v4.0.14+hometown-1.1.1 - so we are not in sync, and Hometown is not caught up to the current version of Mastodon but rather a few versions behind.
This guide might be out of date when you are reading it, so be sure to look up which version of Mastodon you need. If you are just going to install Mastodon, go with the most current version. If you are going to migrate to Hometown, go with the Mastodon version that is matched to the most recent version of Hometown.
Consult the github release pages for each project to see what the current version is:
Mastodon release page Hometown release page
Whatever you decide, substitute the version of Mastodon you want into the following command to grab that version:
git checkout VERSION
If you are going for the current version of Mastodon, you might run:
git checkout v4.2.7
If you plan to migrate to Hometown, based on the above, you might run:
git checkout vSOMETHING_ELSE if Hometown is not caught up to the most recent version of Mastodon.
Build Mastodon
Make sure you are still the mastodon user and in the directory /home/mastodon/live/
Run the following command to get bundle ready to build Mastodon:
bundle config deployment 'true'
Now run:
bundle config without 'development test'
bundle install -j$(getconf _NPROCESSORS_ONLN)
The previous command is bundle doing a lot of work to actually build and install Mastodon. This is another long step. You can watching the output go by. And then end there should be a few notes or mild warnings. Don't worry about any of these, everything should be good.
Finally run:
yarn install --pure-lockfile
which is telling yarn to do it's part of installing Mastodon.
Mastodon set up script
Prepare for the set up script!
Mastodon is now installed, but we need to set up/configure it for the first time.
There is a helpful script that will do a lot of this for you. You'll need to answer several questions about your Mastodon instance, and enter many of the credentials we've collected so far in this guide. Before running this script, make sure you have handy the following things (ideally they are all saved in your password manager!):
- Mailgun SMTP username (probably
postmaster@mg.YOUR.DOMAIN) - Mailgun SMTP password
- postgres username (default was
mastodon) - postgres password
- the name of your S3 Bucket (
BUCKETNAME) - the full URL for your S3 Bucket (
BUCKETNAME.us-east-1.linodeobjects.comor something similar - note that theus-east-1section may be different for you, it will depend on the physical location Linode is hosting your Bucket) - S3 Access Key
- S3 Secret Key
YOUR.DOMAINname- email address for the admin account
This step is also going to set up the e-mail sending with Mailgun, and if you recall you had to ask Linode to open port 587 on your server for e-mail to work. Have you heard back from Linode about the ticket you opened in that step? If not, you might want to wait before starting the next step.
Mastodon set up
Make sure you are still the mastodon user and in the directory /home/mastodon/live/
Then run:
RAILS_ENV=production bundle exec rake mastodon:setup
to run the set up script. Let's walk through the prompts:
- Domain name:
YOUR.DOMAIN - Do you want to enable single user mode?
n - Are you using Docker to run Mastodon?
n - PostgreSQL host: hit enter to accept default
- PostgreSQL port: hit enter to accept default
- Name of PostgreSQL database: hit enter to accept default
- Name of PostgreSQL user: hit enter to accept default (
mastodon) - Password of PostgreSQL user: hit enter
- Redis host: hit enter to accept default
- Redis port: hit enter to accept default
- Redis password: hit enter to accept default
- Do you want to store uploaded files on the cloud?
ythen use the arrow keys to selectAmazon S3and hit enter - S3 Bucket name: this should be what you entered as your Bucket name. Not the full URL, but just the name:
BUCKETNAME - S3 region: just enter
USif your S3 Bucket is in the united states - if it's not, then try using whatever letters represent the country in the full url of your Bucket - S3 hostname: this is the full url for your Bucket, the long thing ending in
linodeobjects.comegBUCKETNAME.us-east-1.linodeobjects.com - S3 Access Key: enter the Access Key you created
- S3 Secret Key: enter the Secret Key you created
- Do you want to access the uploaded files from your own domain?
y - Domain for uploaded files:
files.YOUR.DOMAINthis is the actual subdomain we set up to point to the Bucket (notBUCKETNAME) - Do you want to send e-mails from localhost?
n - SMTP server:
smtp.mailgun.org - SMTP port: hit enter to accept default
- SMTP username:
postmaster@mg.YOUR.DOMAIN - SMTP password: enter the SMTP password you created with Mailgun
When you type or paste in the password, it won't show on the screen. but when you hit return, you'll get a positive message if it was correct. Continuing:
- SMTP authentication: hit enter to accept default
- SMTP OpenSSL verify mode: hit enter to select
none - Enable STARTTLS: hit enter to select
auto - E-mail address to send e-mails "from":
no-reply@mg.YOUR.DOMAIN - Send a test e-mail with this configuration right now?
y - Send test e-mail to: enter your own e-mail, to get a test e-mail!
If it worked and you received the test e-mail, type y to save the config.
If you did not receive the test e-mail, or you think you made a mistake elsewhere, type n to cancel. The script will close and you'll be back at the command line. Now you'll have to start over by running the original command again:
RAILS_ENV=production bundle exec rake mastodon:setup
If instead the e-mail set up worked, type y to continue:
- Prepare the database now? type
y - Compile the assets now?
y
This will take awhile (and consume a lot of RAM, as it says)
Your little Linode server is now chugging away building Mastodon from source! Go do a few dishes and stretch and come back.
When it's done it should say:
All done! You can now power on the Mastodon server
And you will be asked:
- Do you want to create an admin user straight away? enter
y
Now you will be creating the admin account of the instance. This could be your personal account, or it can be a faceless admin account and you can create a personal account later. It's up to you.
Enter the username you'd like to use for this admin account, and an e-mail to be associated with it. Remember this e-mail, because this will be your log-in for your admin account! Then you will be given a generated password for the admin account. Save this in your password manager!
Edit config file
The set up script did a lot of work building Mastodon and filling out our config file, but we do need to edit the config file manually. The config file is in the live directory and it is called .env.production
You will edit this file in the future if you need to change any of these settings, or if you want to edit certain special features of Mastodon or Hometown. For example, you need to edit .env.production if you ever want to set a custom maximum Toot length in Hometown. You will also end up looking at this file if you run into any problems you need to troubleshoot later in this guide.
To edit it, run the following command to open the file in the nano editor:
nano /home/mastodon/live/.env.production
All the answers to the questions you just answered were used to create this file.
You need to add the following line to this file:
S3_ENDPOINT=https://BUCKETNAME.us-east-1.linodeobjects.com
replacing BUCKETNAME with the Bucket name you used, and modifying the rest of the url so it is the same as
You can add this line anywhere, but I suggest adding it near the other S3 variables so it will be easier to find later if you need to troubleshoot something.
While you are here, I strongly suggest looking over the .env.production config file for errors or typos. If things don't work later, there is a good chance it's because of a mistake or type here.
Here is an example of the .env.production config file for tuppy.town - I've replaced sensitive values like passwords and keys with ###### where in your own file you should see the actual values. Hopefully this example can help you verify that your config file is correct.
# Generated with mastodon:setup on 2022-11-22 18:19:51 UTC

LOCAL_DOMAIN=tuppy.town
SINGLE_USER_MODE=false
SECRET_KEY_BASE=######
OTP_SECRET=######
VAPID_PRIVATE_KEY=######
VAPID_PUBLIC_KEY=######
DB_HOST=/var/run/postgresql
DB_PORT=5432
DB_NAME=mastodon_production
DB_USER=mastodon
DB_PASS=######
REDIS_HOST=localhost
REDIS_PORT=6379
REDIS_PASSWORD=
S3_ENABLED=true
S3_PROTOCOL=https
S3_BUCKET=tuppytownfiles
S3_REGION=US
S3_HOSTNAME=tuppytownfiles.us-east-1.linodeobjects.com
AWS_ACCESS_KEY_ID=######
AWS_SECRET_ACCESS_KEY=######
S3_ALIAS_HOST=files.tuppy.town
S3_ENDPOINT=https://tuppytownfiles.us-east-1.linodeobjects.com
SMTP_SERVER=smtp.mailgun.org
SMTP_PORT=587
SMTP_LOGIN=postmaster@mg.tuppy.town
SMTP_PASSWORD=######
SMTP_AUTH_METHOD=plain
SMTP_OPENSSL_VERIFY_MODE=none
SMTP_FROM_ADDRESS=no-reply@mg.tuppy.town
Note that all the S3 related settings are specific to Linode (and I truly had to figure them out by trial and error). If you ended up using a different S3 compatible Object Storage provider, your settings here might look quite different!
When you are done, save the file by typing control-o followed by enter to save your changes and then exit nano by typing control-x
That's it. If all went well, you have installed Mastodon...
Type exit to switch back to user from the mastodon user.
Configure nginx
nginx is the webserver we will use. This handles the actual requests from users coming in to your server from the internet and passes them to Mastodon running behind it.
Make sure you are user for this section. Type whoami to be sure. If you are still the mastodon user, type exit to return to the user user.
nginx config for Mastodon
nginx is the webserver we use in front of Mastodon. It's configured using config files in the /etc/nginx/sites-available directory.
First we will copy the default nginx configuration Mastodon provides into the right place so nginx can use it. Run the following command:
sudo cp /home/mastodon/live/dist/nginx.conf /etc/nginx/sites-available/mastodon
This copies the default config file Mastodon provides us into the directory where nginx will actually use it.
Next, we have to edit the configuration for our purposes. We'll use nano again:
sudo nano --linenumbers /etc/nginx/sites-available/mastodon
Wow! What a terrifying file. We're going to carefully make some edits to this file. We need to change the default example.com to YOUR.DOMAIN
On lines 27 and 36, replace example.com with YOUR.DOMAIN
On line 49 and 50, there are two commented lines:
# ssl_certificate /etc/letsencrypt/live/example.com/fullchain.pem;
# ssl_certificate_key /etc/letsencrypt/live/example.com/privkey.pem;
Delete these lines, and replace them with the following two lines:
ssl_certificate /etc/ssl/certs/ssl-cert-snakeoil.pem;
ssl_certificate_key /etc/ssl/private/ssl-cert-snakeoil.key;
We are done editing the nginx config file. Hit control-o followed by enter to save the changes, then control-x to exit nano.
Run this command to activate the configuration for the Mastodon instance:
sudo ln -s /etc/nginx/sites-available/mastodon /etc/nginx/sites-enabled/mastodon
What's this command doing? nginx has kind of a weird way of working. The directory /etc/nginx/sites-available is where you put config files for different websites or services that you want nginx to serve. But they are not active if they are in this folder. To activate a specific config file for a given website, you create a link or alias that points to the config file, and place the new link in the /etc/nginx/sites-enabled directory. ln is the command for creating a link. To turn sites on or off, you delete or create links in the sites-enabled directory, but you always keep the config file "on-hand" in the sites-available directory.
nginx config for proxy cache and Object Storage
We are going to create a second nginx configuration file for our Object Storage Bucket. Remember we set up the files.YOUR.DOMAIN subdomain in our Domain Settings? Now we have to configure the server to handle requests for that domain, and proxy those requests to the Bucket with a nice efficient cache in there too! This will offer some performance improvements and make sure links to your media files always work. This follows the official doc instructions here.
Create the new config file by running:
sudo touch /etc/nginx/sites-available/files.YOUR.DOMAIN
Then open it:
sudo nano --linenumbers /etc/nginx/sites-available/files.YOUR.DOMAIN
First, paste in the following, which is the default config Mastodon provides for this:
server {
  listen 443 ssl http2;
  listen [::]:443 ssl http2;
  server_name files.YOUR.DOMAIN;
  root /var/www/html;

  keepalive_timeout 30;

  location = / {
    index index.html;
  }

  location / {
    try_files $uri @s3;
  }

  set $s3_backend 'https://BUCKETNAME.us-east-1.linodeobjects.com/BUCKETNAME';

  location @s3 {
    limit_except GET {
      deny all;
    }

    resolver 8.8.8.8;
    proxy_set_header Host BUCKETNAME.us-east-1.linodeobjects.com;
    proxy_set_header Connection '';
    proxy_set_header Authorization '';
    proxy_hide_header Set-Cookie;
    proxy_hide_header 'Access-Control-Allow-Origin';
    proxy_hide_header 'Access-Control-Allow-Methods';
    proxy_hide_header 'Access-Control-Allow-Headers';
    proxy_hide_header x-amz-id-2;
    proxy_hide_header x-amz-request-id;
    proxy_hide_header x-amz-meta-server-side-encryption;
    proxy_hide_header x-amz-server-side-encryption;
    proxy_hide_header x-amz-bucket-region;
    proxy_hide_header x-amzn-requestid;
    proxy_ignore_headers Set-Cookie;
    proxy_pass $s3_backend$uri;
    proxy_intercept_errors off;

    proxy_cache CACHE;
    proxy_cache_valid 200 48h;
    proxy_cache_use_stale error timeout updating http_500 http_502 http_503 http_504;
    proxy_cache_lock on;

    expires 1y;
    add_header Cache-Control public;
    add_header 'Access-Control-Allow-Origin' '*';
    add_header X-Cache-Status $upstream_cache_status;
  }
}
Now, make some edits. Below I'm showing examples of what the lines should be changed to based on my domain being tuppy.town
On line 4, change
files.YOUR.DOMAIN
to your corresponding value eg:
tuppy.town
On line 17, change
https://BUCKETNAME.us-east-1.linodeobjects.com/BUCKETNAME
to the correct full url of your Bucket including https:// eg:
https://tuppytownfiles.us-east-1.linodeobjects.com/tuppytownfiles
Note the above line has two places where you need to enter your BUCKETNAME, and your region (us-east-1 might be different!!).
On line 25, change
BUCKETNAME.us-east-1.linodeobjects.com
to the full url of your Bucket, without https:// eg:
tuppytownfiles.us-east-1.linodeobjects.com
On line 8, add the following two lines:
ssl_certificate /etc/ssl/certs/ssl-cert-snakeoil.pem;
ssl_certificate_key /etc/ssl/private/ssl-cert-snakeoil.key;
Do a double-check of everything, and then type control-o followed by enter to save your changes, and then control-x to exit nano.
Run this command to activate this configuration:
sudo ln -s /etc/nginx/sites-available/files.YOUR.DOMAIN /etc/nginx/sites-enabled
Certbot
We have to run certbot to handle our SSL certificates for YOUR.DOMAIN and files.YOUR.DOMAIN so that https will work (and everything has gotta be https these days!). We'll use certbot to get a free certificate from Let's Encrypt.
sudo certbot --nginx
In this commmand, we are telling certbot to get and validate SSL certificates for YOUR.DOMAIN and files.YOUR.DOMAIN. To do this, certbot needs to prove to Let's Encrypt that you actually control the server behind the domain names you are requesting certificates for. Let's Encrypt independently looks up the domain name and finds your certbot running there, which proves you control the domain and are entitled to the certificate! This is a simplificaiton, but I just want to give you an idea of what's going on this step, since it's a common point of failure.
Now, certbot will first, ask you to enter an e-mail. This e-mail will be used to notify you if your certificates are going to expire! Use the admin e-mail you set up for your instance.
Then you'll have to hit y to confirm you've read Let's Encrypt's Terms of Service and n to decline to sign up for e-mails.
Hit enter to let certbot request certificates for both domains.
You should get success messages when running these commands. If you don't, it's important to stop and figure out what went wrong. Go back to the previous two steps where you set up the nginx config files (any error messages should tell you which domain may be causing the issue).
Finally, reload nginx with the new config files by running:
sudo systemctl reload nginx
Open a new tab in your browser and go to https://YOUR.DOMAIN
You should see the sad Mastodon. This is ok, because we havn't actually started up Mastodon yet.
Troubleshooting nginx
If you got an error on the last step, try stopping and starting nginx:
sudo systemctl stop nginx
sudo systemctl start nginx
Any further errors are likely due to a mistake somewhere in the two different config files. Go back to the previous three steps and carefully check over the config you edited for typos or other mistakes. Did you accidentally delete a } somewhere?
It's common to accidently screw up the links to the nginx config files. The /etc/nginx/sites-available directory should have 3 files: default, mastodon (config file for YOUR.DOMAIN), and files.YOUR.DOMAIN (for the Object Storage proxy/cache). The latter two are the ones you created/edited. If there are any other files in here, you probably want to delete them.
Reminder that ls is the command to list a directory contents, and rm is the command to delete a file.
Similarly, check in the /etc/nginx/sites-enabled directory. You should see only mastodon and files.YOUR.DOMAIN which should actually be links to the corresponding config files in sites-available. If there are extra files, or if you think the links might be broken, delete them and try recreating the links (using the ln command, see the previous steps where it was used!).
You can also start over with the config files. If you go back to the section nginx config for Mastodon step, you can re-run the first command to create a new nginx file from the default Mastodon provides:
sudo cp /home/mastodon/live/dist/nginx.conf /etc/nginx/sites-available/mastodon
And then repeat the other steps to hopefully not reproduce any errors that are tripping you up.
Similarly, you can go back to the previous section nginx config for proxy cache and Object Storage and delete the contents of /etc/nginx/sites-available/files.YOUR.DOMAIN and replace them with the starting version in the guide. Then follow the steps again to recreate that config file.
Finally, did everything in the Certbot step go ok? If there were any errors there and your certificates weren't created properly nginx will not work. If you tried re-doing the nginx configs from scratch, you probably need to repeat the certbot step as well!
Start Mastodon
As user use this command to copy the 3 services that run Mastodon where they need to be:
sudo cp /home/mastodon/live/dist/mastodon-*.service /etc/systemd/system/
Now load them for the first time with the systemctl command:
sudo systemctl daemon-reload
sudo systemctl enable --now mastodon-web mastodon-sidekiq mastodon-streaming
DID IT WORK?
Wait a minute, and then go to https://YOUR.DOMAIN in your browser.
You should see the Mastodon instance home page.
Log in as your admin user, using the e-mail you set during the configuration script and the password that was generated (you should probably change that password when you get a chance!)
Testing the install
Before we move on, let's make sure everything worked. First, try making a post, see if it shows up.
Now try making a post with an image attached.
Did everything work? Did the image upload properly, even if you click through to view the full image? Any problems here can suggest an issue you can troubleshoot before moving on.
If you feel like it, make a "hello world" post and tag me @n00q@don.n00q.net - it'll give me a little ping that someone is working on this guide and made it this far, and let you test that federation is working!
Troubleshooting Mastodon
Checking the Mastodon config file for mistakes
Suppose making a post, or attaching an image doesn't work? It could be because of an error in your config file.
Switch to mastodon user:
sudo su - mastodon
Open the Mastodon config file:
nano /home/mastodon/live/.env.production
Look over everything. Is there a typo? Is everything correct? You can paste in passwords from your password manager and make sure all the different domain names and their variations are correct. You can go back to the [[#Edit config file]] section and look over the example config file again.
If e-mail isn't working, check the e-mail settings.
If image upload isn't working, check all the S3 settings. You can try deleting your Bucket in Linode and then re-creating it with the same name, and then create new Access and Secret keys for it and paste these new keys into .env.production
When you are done making any edits or changes to .env.production, type control-o to save your changes and control-x to exit nano
Switch back to user by typing exit
And then restart Mastodon so your changes take effect:
sudo systemctl restart mastodon-*
Checking the logs
The following command will give you a live school of the log for Mastodon:
sudo journalctl -u mastodon-web --follow
While this is open, try doing what doesn't work in your browser and see what happens. You may be able to glean a useful clue, or copy some errors to send to a friend to help with troubleshooting.
Starting over from scratch
This is your last resort. If you've tried a bunch of troubleshooting and debugging, maybe you've typed in random commands you found online and now it's hopeless and nothing works you still have one thing you can do, which is start over.
Log into Linode and select your Linode server and choose the option to Rebuild it. You can reflash it with the Debian 11 image, and you'll have to set the root password again. You will be starting fresh with a new server! Delete the Object Storage Bucket too. Log into Mailgun and delete your domain.
Now, you can start this guide again from the [[#Server provisioning from Linode]] step and just try everything again. Remember to keep track of which passwords you need to save/which ones you will be re-creating.
There's no shame in this! The first time I did this, I probably repeated the process 4-5 times before it worked. It's normal, and it's not a bad way to learn more about the process and become more familiar with all this stuff.
Mastodon stopping point
If you just wanted to install Mastodon, that's it. Skip the next part and go straight to Final Things
Hometown
Let's turn our new Mastodon instance into a Hometown instance!
We will be following along with the official instructions in the Hometown documentation.
If you are picking this up another day, you'll need to ssh back into your server from the terminal on your home computer:
ssh user@YOUR.DOMAIN
The first thing you need to do is stop Mastodon. If you try to install Hometown while Mastodon is running, your poor little Linode server will almost certainly run out of memory and the process will fail. This command will stop all the Mastodon services:
sudo systemctl stop mastodon-*
Hopefully you warned you users about downtime first ;)
Now you need to switch to the mastodon user:
sudo su - mastodon
and then put yourself in the live directory where Mastodon lives:
cd ~/live
or
cd /home/mastodon/live
You need to be in the mastodon user in the live directory to run all the next commands.
Versions
This was covered earlier in the section [[#Choosing a version of Mastodon]], but a quick refresh. Hometown is based on Mastodon, and it's (usually) based on a version of Mastodon that is older than the most recent version. If you were intending to install Hometown, you have hopefully already installed the appropriate version of Mastoton!
At the time I'm updating this guide, the current version of Mastodon is v4.0.2 and the current version of Hometown is v4.0.2+hometown-1.1.0 so things are easy. All the following commands assume you are at Mastodon v4.0.2 and installing Hometown v4.0.2+hometown-1.1.0 but please ensure this is actually what you want to do if you are reading in the future and versions could be different!
If you are far enough in the future, you will have to check the Hometown installation docs to make sure you enter the versions correctly, and there might be additional/different commands. (I would still suggest reading through this guide as well though, since it will hopefully explain some of the steps more clearly for a novice user!)
Verify that you indeed have the correct version of Mastodon installed:
git describe --tags
If you get an error, you are not in the correct directory. Are you in /home/mastodon/live?
You should get an output like v4.0.2, or whatever version of Mastodon you installed.
Next, we'll run several git commands. I won't pretend to understand git enough to try and explain in detail what is going on. But git is a tool developers use to track different versions of their code over time, and collaborate on large projects. Hometown is a fork of Mastodon, so it uses 99% of Mastodon's code and then changes a few things. We have to tell git that we want to use the Hometown fork version of Mastodon instead of the plain regular Mastodon version. git will be know all the little pieces of code that are different in Hometown and go fetch them for us.
Run the following 3 commands to tell git you want to use the Hometown fork of Mastodon
git remote add hometown https://github.com/hometown-fork/hometown.git
git branch hometown-v1.1.0
git checkout hometown-v1.1.0
Now run
git fetch hometown
and
git merge v4.0.2+hometown-1.1.0
To actually grab the Hometown code. Run the next command to fetch and install any Ruby packages you need:
bundle install
Hometown adds a few things to the database that Mastodon users, so you need to migrate the Mastodon database to the new Hometown database. This might take awhile, especially if you arn't starting with a fresh un-used Mastodon installation:
RAILS_ENV=production bundle exec rails db:migrate
Now run the final command to build Hometown!
RAILS_ENV=production bundle exec rails assets:precompile
You may get some output with mild warnings, but if you see: Compiled all packs in /home/mastodon/live/public/packs that means it worked!
Restart Mastodon+Hometown
If all went well, should now have Hometown (or as I've recently taken to calling it Mastodon+Hometown).
The last step is to restart the Mastodon services.
Leave the mastodon account and switch back to the user account by typing exit
Then restart the Mastodon services:
sudo systemctl restart mastodon-web mastodon-sidekiq mastodon-streaming
Open your browser and go to your instance https://YOUR.DOMAIN
Things will probably look mostly the same, but you will know it worked if you can see the little blurb about Hometown at the bottom of the page:
Final things
Disable open registration
A fresh Mastodon installation has open registration turned on by default. This means that anyone with an e-mail address can register for an account and immediately start posting whatever they want. Odds are this is not what you want. I strongly suggest you turn this off while you get your bearings and decide how to invite your friends/community to join you on your instance. Logged in as the admin user account you created, go to https://YOUR.DOMAIN/admin/settings/edit and find Registrations mode on the second line of options. Set this to Approval required for sign up or Nobody can sign up.
Firewall
During the [[#Server set up]] section we didn't set up any kind of firewall. I find it is more intuitive to do this after setting up everything else. You now (hopefully) understand all the services running on your server. A firewall will block all other types of connections and only allow the connections the different services actually need.
Recall we have SSH so you can connect to your server with ssh, our webserver nginx is running to serve Mastodon on the internet, and we are sending e-mails via SMTP on port 587 (remember we had to ask Linode to open that port at their special extra firewall).
We can quickly set up a simple firewall called ufw. Run:
sudo apt install ufw
to install it. Now to add the rules
sudo ufw allow 'Nginx HTTP'
sudo ufw allow 'Nginx HTTPS'
These two allow the web traffic to nginx
sudo ufw allow 'OpenSSH'
This allows the ssh connection, which you are using right now to connect to your server on the command line! If you forget this, you won't be able to connect to your server via ssh anymore!
sudo ufw allow out 587
This will allow outgoing SMTP ie the e-mails Mastodon sends to it's users.
Finally, enable the firewall:
sudo ufw enable
ufw will now be running, and should run automatically every time your server reboots!
Weekly maintenance tasks
There are certain cleanup tasks which should be run periodically. Notably, you need to purge lots of extra media files that fill up over time. This include images and avatars from users on other instances, and link preview images that are generated for posts your instance handles. Once the posts are old, it's unlikely any of your users are going to look at the them again, so you can just delete them to save space. If a user does go digging up an old post, your instance can just fetch the image again from the other instance where it originated! It's strongly recommended that you set up cron to run tasks that delete all these old files on a regular basis, say weekly. These instructions are based on the official Mastodon docs.
While logged into your server make sure you are the mastodon user (whoami) or switch to the mastodon user if necessary:
sudo su - mastodon
Run
crontab -e
and hit enter to edit the cronfile in nano
Paste the following two lines to the bottom of the file
@weekly RAILS_ENV=production /home/mastodon/live/bin/tootctl media remove
@weekly RAILS_ENV=production /home/mastodon/live/bin/tootctl preview_cards remove
Control-o to save and control-x to exit nano
Long Term Maintenance
There is some periodic maintenance that you need to perform to keep your Mastodon (+Hometown) server happy.
Set yourself a regular time every 2 weeks (every month at most) to check on your server and perform these tasks.
System updates
You need to keep the operating system and all the packages on your server up to date. This is especially important for security. Keep your server up to date is possibly the most important practice for keeping it (and your users) secure.
Installing updates runs the (small) risk of breaking something on your server. For this reason, it's a good idea to keep backups, and to run a backup before installing updates. Backups are covered in the next section.
To check for and install updates, first connect to your server over ssh
ssh user@YOUR.DOMAIN
Run
sudo apt update
to fetch all the new updates that may be available for your server. Next, run
sudo apt upgrade
to apply all those updates.
You maybe have to click Enter or type y while applying all the updates.
After installing the updates, it's a good idea to reboot the server. You can use the command
sudo reboot
which will immediately kick you off, or reboot the server from the Linode dashboard if you are logged in there.
Backups
Backing up your instance data is a good idea.
Linode backups
The easiest way to manage backups is to enable Linode's automatic backups. It costs $2.50/month and they take and store automatic backups at 3 frequencies: daily, weekly, and biweekly, and you also gain the ability to create a snapshot anytime you want (like before you install system updates, or install a Mastodon/Hometown upgrade).
These backups will backup everything on your server, including your configurations and your database (which is all the non-media content of your instance - all the users and posts). If the database dies, your instance dies.
Because you set up an Object Storage bucket for media storage, none of your media files/attachments are included in these backups. However, as far as I know Object Storage is pretty reliable, and also isn't something you are likely to be able to accidentally delete or break because of an update.
Using these Linode backups mean if you totally fuck up your instance while trying to update/upgrade, or if your instance runs into trouble for some other reason because, you can easily restore the whole thing with a click from your Linode dashboard.
Manual backups
There are ways to manually backup your entire database, or all the media on an Object Storage Bucket, but these methods are actually beyond my own experience! All to say that if you really get going, you can look into more sophisticated backup options that you can manage yourself.
Regular reboots
Mastodon is known to have a memory leak issue, and so if it runs continuously for long enough, it will eat up the memory and the server will crash. It is a good idea to periodically reboot your server. I'm not actually sure how often, but maybe whenever you log in to install updates?
Making sure the disk isn't full
If you followed this guide exactly, your little Linode server has a 50GB hard drive. Now, all the media files (images, videos, audio files) are stored in your Object Storage Bucket, which holds 250GB and can't really fill up. If your users really love to post a lot of memes and you go over 250GB your monthly bill will just increase slightly.
But the 50GB hard drive in the server itself is holding the database, and log files, and such things. It can gradually fill up. This probably isn't something you need to worry about for awhile. But if you are logged into your server, you can type df -h to see a summary of your filesystem. The important line will be something like:
/dev/sda 49G 5.4G 42G 10% /
If you see that % getting close to 80%, you might need to upgrade to a larger server, or delete some growing log files.
Mastodon/Hometown updates
Mastodon and Hometown are both active projects, and get updated periodically. Sometimes these updates are just minor bug fixes, sometimes they are important security patches, and sometimes they are major upgrades with many new features.
The best way to hear about updates is to check the Mastodon and Hometown github pages, and to follow the lead developers @gargron@mastodon.social (Mastodon) and @darius@friend.camp (Hometown) on the Fediverse itself!
Whenever there is a new version of either Mastodon or Hometown, there will usually be instructions posted on how to upgrade. Here is an example of the upgrade instructions for Mastodon v4.0.2
These instructions are written for nerds. They are inconsistently presented, and not necessarily easy to follow if you are new to this stuff. And the stakes are high, because if you mess up you could break your instance.
Remember that if you followed this guide you have a non-Docker installation. The instructions to upgrade Mastodon will often include steps for Non-Docker (only), Docker (only), and Both Docker and non-Docker. You must only follow the Non-Docker, Non-Docker only, and Both Docker and non-Docker as well as any other instructions indicated as Update steps (which by default means they apply to both Docker and non-Docker installations). You don't follow any instructions indicated as Docker only because you didn't use Docker!
If you havn't upgraded in a while and are several versions behind, don't just apply the instructions for the newest update. Go back to the version you are on and then follow the instructions for each subsequent update. You can skip some versions listed, if there are no Upgrade/Update Instructions. It's still a good idea to read the notes on each one, to see if there is any step you might need to apply.
Note for Hometown upgrades
If you are running Hometown instead of Mastodon, don't forget! There may be a new Mastodon version out, that everyone is installing and buzzing about the new features. You can't upgrade your Mastodon+Hometown until there is a new version of Hometown. You don't apply any Mastodon upgrades, just the Hometown upgrades.
Upgrade tips
In any case, there are two things which are sometimes not mentioned in the update/upgrade instructions for Mastodon or Hometown.
1. Stop Mastodon services before performing the upgrade (and then restart them after)
As user type
sudo systemctl stop mastodon-*
To stop all the Mastodon services (this is the same if you are running Hometown).
After you have completed all the upgrade steps, type
sudo systemctl start mastodon-web mastodon-sidekiq mastodon-streaming
to restart everything.
2. All of the commands in these upgrade instructions should be run in the /home/mastodon/live directory as the mastodon user.
Upgrade instructions for Mastodon or Hometown are generic and not everyone will have the same set up. They will assume you are already in the correct directory where your Mastodon installation lives and working as a user with the correct privileges. If you followed this guide then you need to run these upgrade steps as the mastodon user in the /home/mastodon/live directory, and the upgrade instructions from Mastodon/Hometown will not remind you of this!
When you first first connect to your server, you are (most likely) the user we created in this guide, user. To switch to the mastodon user type
sudo su - mastodon
Now type
cd /home/mastodon/live
to get to the correct directory.
Ask for help
If you are really new to this, and nervous about upgrades, ask for help! Mastodon/Hometown admins love to help out. When there is a new version that you want/need to upgrade to, consider asking a more experienced sysadmin to walk you through the steps before you try it. The #MastoAdmin hashtag is a great way to reach other, more experienced, admins.
Make yourself redundant
If you set up this instance as an individual admin, then you need to consider what happens to the instance if you get hit by a bus. Consider finding at least one other person who can take over the instance if something happens to you. That means having access to all the relevant credentials (usernames, passwords, e-mail accounts) and also posessing the technical knowledge to maintain the server in the short and long term. Also consider collectivizing the management and administration of your instance among several people (or even all the users), either formally as a cooperative or some similar informal non-hierarchical organizational structure. This can be a great way to build something sustainable and long-lasting.
And if you already set up your instance as a collective/cooperative. Great job!!
Further reading
How to run a Mastodon instance
These are links dealing with everything after this guide: how to actually run a Mastodon server in terms of administration, moderation, policy, etc. Also useful to consult before starting an instance!
Mastodon Moderator Tools (video)
On Running a Mastodon Instance
Guides to installing Mastodon
Some other guides that I either consulted to put this together, or that look useful. Check these out if you want to see alternative methods to installing Mastodon. These other guides might also help you troubleshoot things if you are stuck and my guide has let you down.
How To Open An Outpost In Social Media Exile
Official Mastodon installation docs
Official Hometown installation docs
How to install Linux on Ubuntu
Build your own Mastodon server on Debian
How to install Mastodon on Ubuntu 22.04
Host your own Mastodon instance on a Raspberry Pi
Making your own Mastodon Server in 10 steps
Getting Mastodon working with Amazon S3 file-hosting
Other guides to scaling Mastodon
These links have info on how to scale Mastodon. Even if you aren't needing to adjust or tune your Mastodon instance just yet, it can be useful to look at guides like this to start understanding how Mastodon works and the different places you can intervene if your instance is underpowered.
Scaling Mastodon: The Compendium
Contact
Contact me if you have any comments, corrections, feedback, etc. I will do my best to keep this guide up to date with current versions of Mastodon and Hometown.
History
2024-02-19
- updated ruby versions
- modified database set up to match current official Mastodon install from source docs
- updated Mastodon and Hometown versions referenced to match the current versions
2023-11-17
- fixed typos (thanks copyeditor)
- updated nginx reverse proxy config based on changed at Linode
2023-01-07
- fixed typos
- current version of Mastodon and Hometown both now use ruby version 3.0.4, so deleted mention of ruber 3.0.3 error that could happen perviously
- added a note about not using a sketchy-sounding e-mail address to sign up for accounts with Linode/Mailgun
- updated throughout to reflect the current version of Hometown is v4.0.2+hometown-1.1.0